15 Most Powerful Ways to Speed Up Windows 10 [2021]
Most Powerful Ways to Speed Up Windows 10: There are several important things we must do to optimize the performance of Windows 10.
Starting from setting the Boot Menu Timeout so that Windows can start quickly when turned on, to as simple as keeping the system clean from junk files.
Windows 10, which is the most widely used operating system today, has many advantages when compared to the versions below.
Its complete features and high compatibility make it very comfortable to use for various purposes.
Speeding up the loading of Windows 10 is something you must do if you want to optimize your productivity at work because we both know that slow Windows can spoil the mood and even make you angry.
How to Speed Up Windows 10 for Better Performance
On this occasion, TechMaina will provide some really powerful tips to keep your Windows 10 light, fast, and anti-slow.
1. Reduce The Boot Menu Timeout Duration
Speeding up Windows 10 means speeding up the boot process when your laptop or PC is turned on for the first time.
You don’t want to wait for Windows to load too long to get to the desktop. This can be done by reducing the Boot Menu Timeout (BMT) duration.
When the computer is turned on, the boot menu will be displayed for a certain period of time before Windows loads, the goal is that users can perform configurations or other things such as entering Safe Mode.
By default, the boot menu will be displayed for a duration of 30 seconds, which in the case of a normal computer running this 30 seconds is too long. We can reduce this duration to speed up Windows 10 startup when it is turned on.
How:
- Enter Control panel
- Select System
- Click Advanced System Settings
- Go to the Advanced tab
- Click Settings on the Startup and Recovery menu
- In the Time to display a list of operating systems option change to 10 seconds
- Click OK
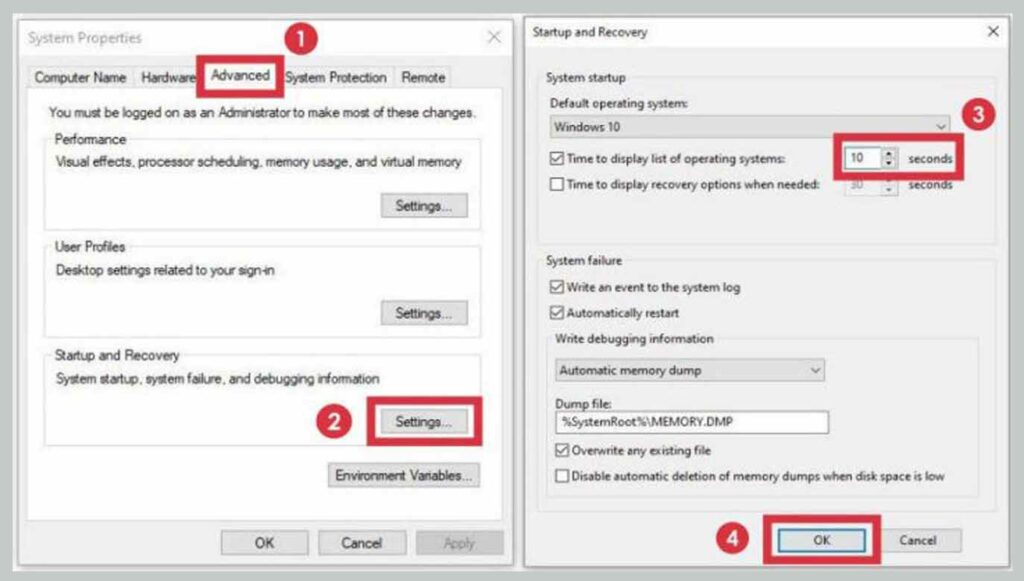
When finished, restart the computer. You will experience the effects caused by this setting, which will speed up Windows 10 boot by cutting the duration for displaying the boot menu.
2. Turn Off The Transparent Effect
The Start menu and Taskbar with transparent effects can indeed make it look prettier, but this also means that we have sacrificed a number of resources to run them.
By turning off this transparent effect, we can save resource usage, making the system lighter and faster.
You need to know that this transparent effect takes up quite a lot of resources, especially RAM, for a laptop or PC with mediocre specs that can actually make performance slow.
Therefore, to speed up Windows 10, we can turn off this feature.
How:
- Click the Windows button then click Settings (gear button)
- Select Personalization
- Click the Color menu
- Click on the Transparency effects option until it turns Off
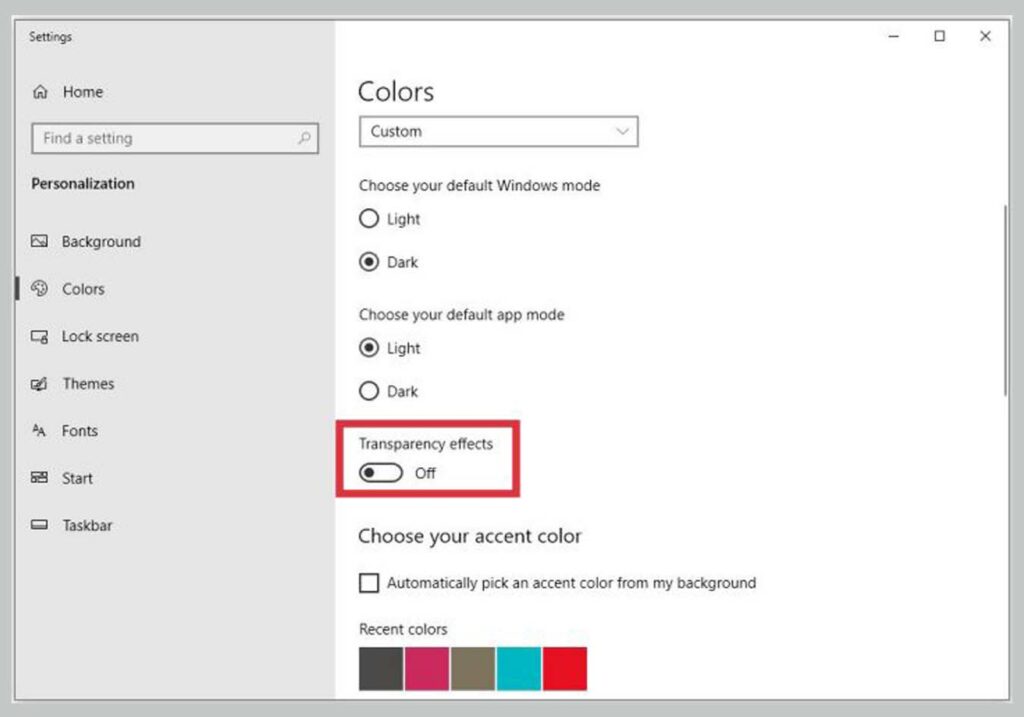
After turning off the Transparency effects, you may notice changes in the Start menu and Taskbar that are no longer transparent. The first time maybe our eyes will feel a little odd when they see it.
To make the appearance more pleasing to the eye, you can adjust the color, change to a softer color that suits your taste. I myself prefer to use black.
3. Turn Off Animation Effects
Windows 10 is equipped with animation effects to make it look even better, but there is a price to pay if we activate it, which is a fairly large consumed resource.
To speed up Windows 10 to make it lighter, you should just turn off this feature. I myself have never activated this feature because, with a plain flat display without animation, the Windows interface looks good.
How:
- Open the Control Panel
- Select System
- Click on Advanced system settings
- Select the Advanced tab
- In the Performance option-click Settings
- On the Visual Effects tab, check to Adjust for best performance
- Click OK
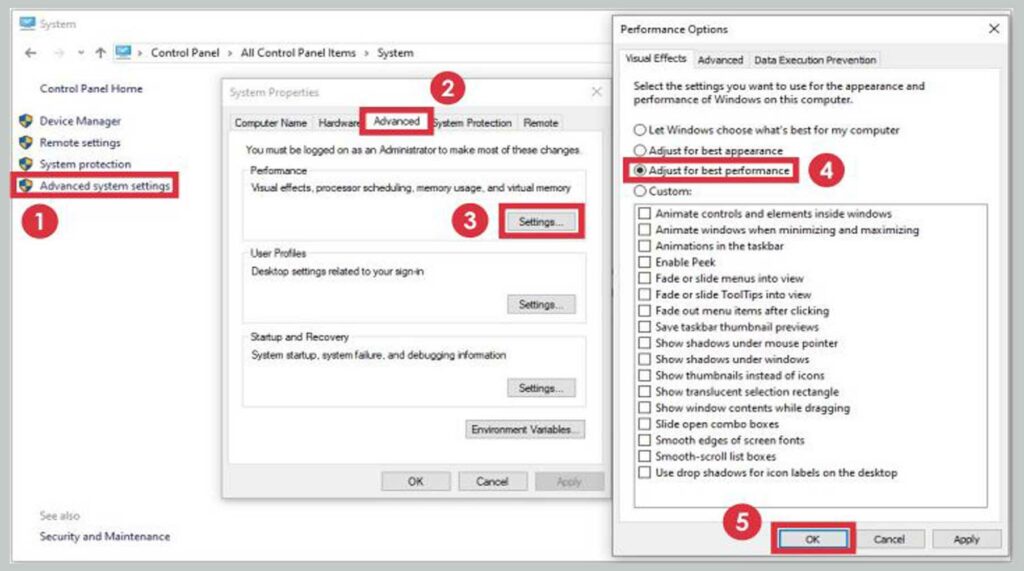
After we select the Adjust for best performance option, Windows will turn off all animation effects which can eat up quite a lot of resources.
As an impact, you may see changes in the appearance of Windows which become flat without any animation effects, but also feel that it is getting lighter.
4. Clean The PC With a Cleaner Application
To keep the system light we also need to clean Windows from junk files such as cache, temp files, thumbnails, and residual files from deleted applications. We can use a cleaner application to perform cleaning automatically.
There are some of the best cleaner applications that I have used and I am quite satisfied with the results, you can see a list of recommendations here:
Cleaning Windows from junk files should be done regularly to prevent these files from accumulating and making our computers slow. In addition, junk files that are never cleaned will make the hard disk full quickly.
5. Turn Off Unnecessary Startup Programs
When the computer is turned on, Windows will load programs that are active at startup shortly after entering the desktop.
The more startup programs that are active, the longer it will take for the computer to be ready to use.
You may see that the cursor only rotates after entering the desktop when the computer is turned on, this indicates that the startup programs loaded by Windows are too many and heavy.
To fix this, we need to turn off startup programs that are not really needed, activate only a few programs that are really important to load when the computer is first turned on.
How:
- Open the Task Manager, right-click on the Taskbar and select Task Manager
- Go to the Startup tab
- There you will see a list of programs that are loaded when the computer is turned on
- Pay attention to which programs are not really important
- Turn it off by clicking one time and then clicking Disabled
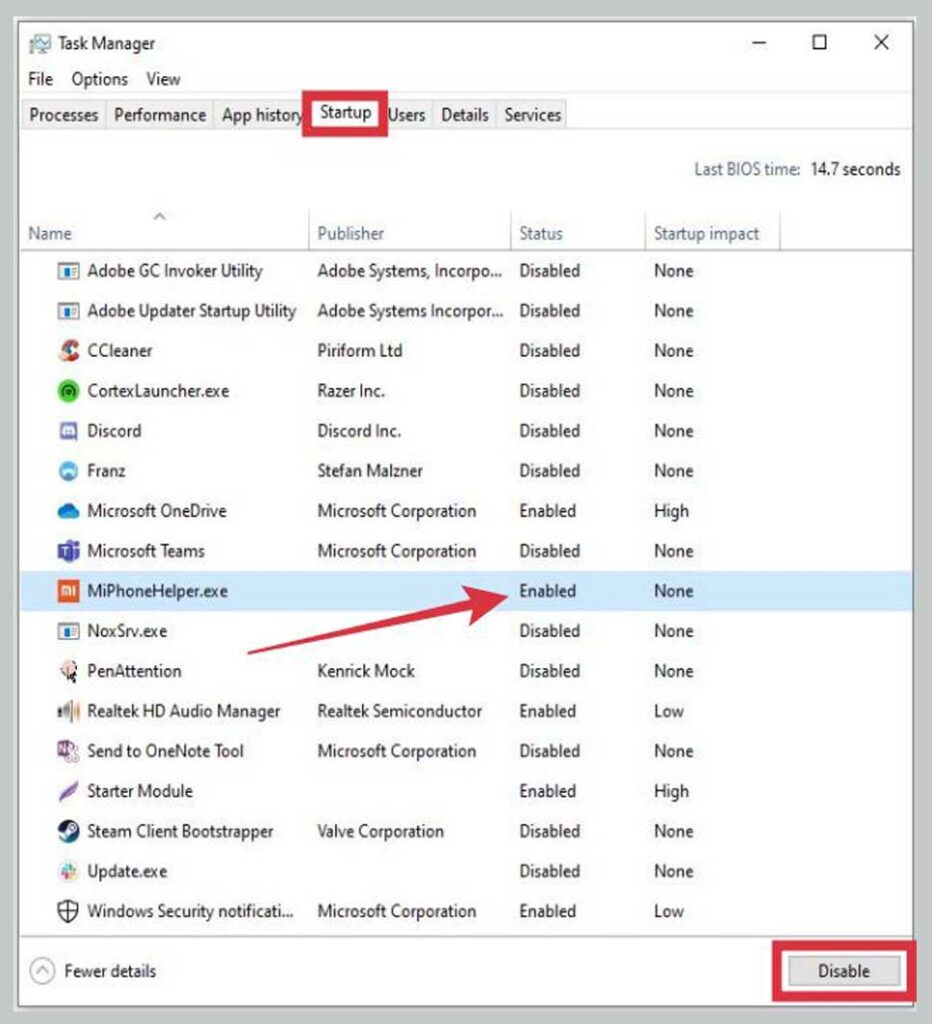
Repeat the above steps until all unnecessary startup programs are turned off. Fewer startup programs will speed up Windows 10 ready for use at startup.
6. Turn Off The Tips&Tricks Suggestion
The tips tricks for suggestion are a built-in feature that has existed since Windows 10 was first installed.
This feature serves to make it easier for users by providing suggestions in the form of popup notifications when operating Windows 10. But unfortunately, most of these suggestions are not really necessary.
Notifications that appear continuously can also be annoying, so we should turn it off so that it can give a boost to Windows 10’s performance.
How:
- Click the Windows button
- Click Settings (button with the gear icon)
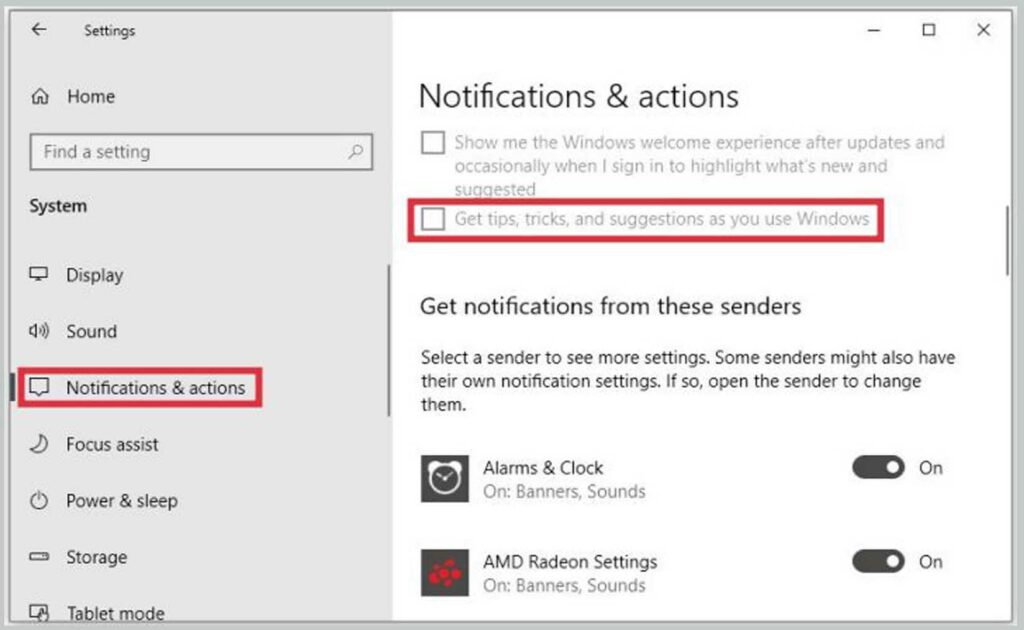
- Select Notifications and actions
- Turn off the Get tips, tricks, and suggestions as you use the Windows option
7. Change The Power Plan Settings
The power plan settings can also affect the performance of Windows 10, when in Power saver plan mode Windows will automatically reduce performance by reducing CPU and memory allocations in order to save battery.
To keep Windows 10’s performance stable and fast, we must use the right power plan settings, in other words, we only use the power saver plan when it’s really needed.
How:
- Enter the Control Panel
- Select Power Option
- In the active power plan, click the Change plan settings option
- At the bottom of the options, click Change advanced power settings
- Choose either Balanced or High performance
- Click OK
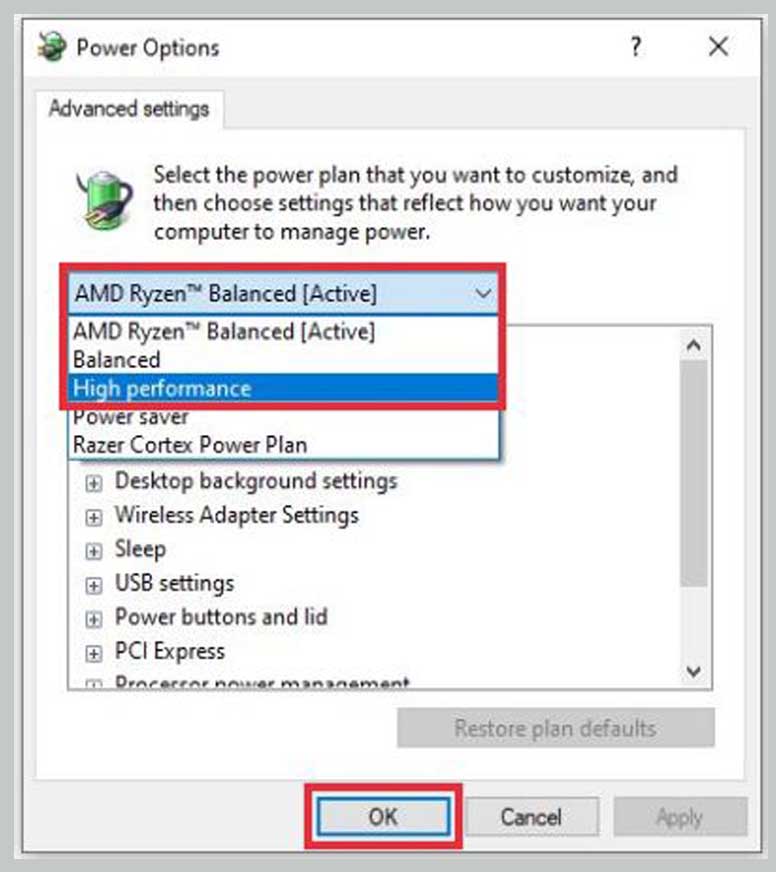
When using a laptop with the charger cable not plugged in, you should use the Balanced setting to save battery, using the High-performance setting can indeed speed up Windows 10 but it can also drain the battery quickly.
8. Turn Off Unnecessary Programs Running in the Background
The more programs installed on Windows 10, the more processes that program will run in the background.
The process of running these background programs is not visible, but it can eat up a lot of resources and cause the computer to feel heavy.
To speed up Windows 10’s performance so that it remains light, we recommend that we turn off programs running in the background using the Task Manager, especially when the computer is running heavy tasks such as editing and rendering video – to prevent the computer from crashing.
How:
- Open the Task Manager
- Go to the Processes tab
- Sort programs based on memory usage
- Select unnecessary programs and click End task
- Repeat with other programs until only the programs you need are left
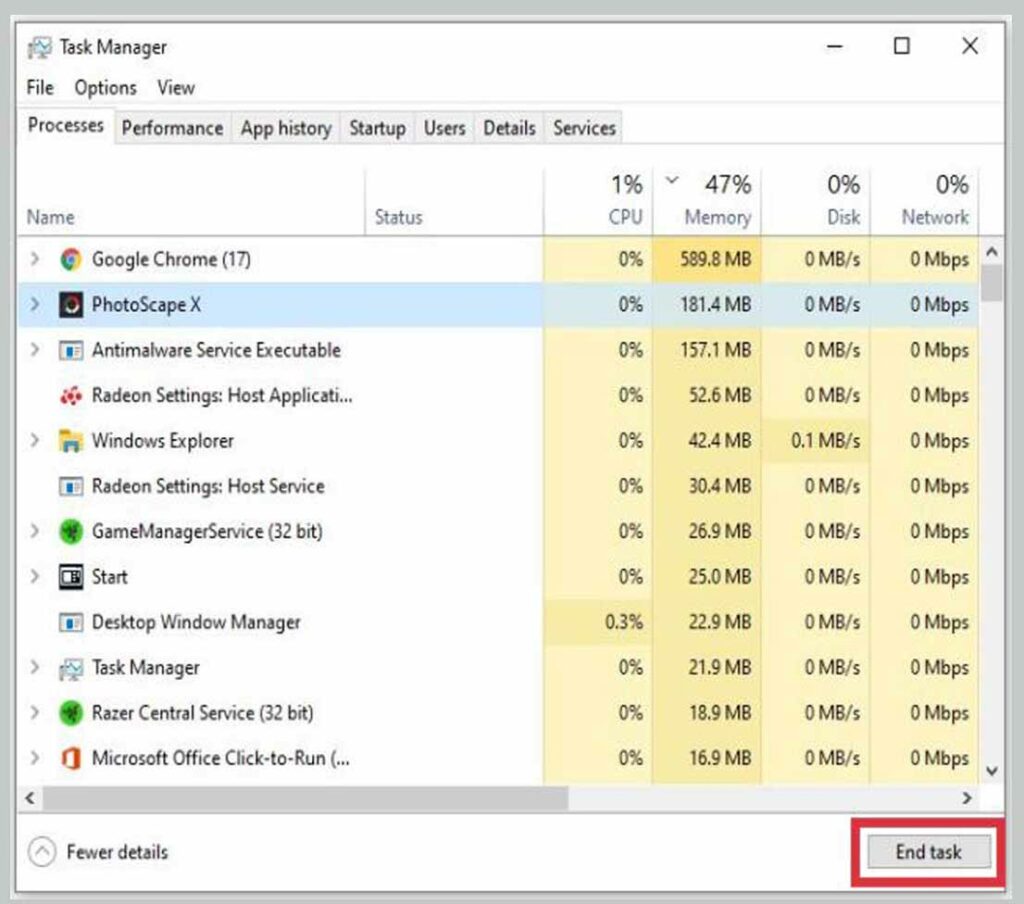
Turning off background programs using the Task Manager is quite useful to keep the available resources, especially memory and CPU, roomy. So that we can run heavy programs without worrying about the computer being slow.
9. Clean Your PC From Bloatware, Adware, and Spyware
Computers that are full of bloatware, adware, and spyware will definitely experience a decline in performance, in severe cases, it can even crash Windows frequently.
These harmful programs are usually inserted when you install programs that are downloaded carelessly or pirated programs.
To prevent these programs from making Windows 10 slow down, we have to clean them using an antivirus.
Fortunately, Windows 10 is equipped with Windows Security (formerly Windows Defender), an antivirus that is powerful enough to prevent various malware attacks.
What we need to do is make sure Windows Security is always updated, and activate real-time protection to prevent malware from entering while surfing in cyberspace.
How:
- Enter Settings by clicking the Windows button> clicking the gear button
- Select Update & Security
- Select Windows Security
- Click Virus and threat protection
- Click Manage settings
- Enable Real-time Protection and all the options available
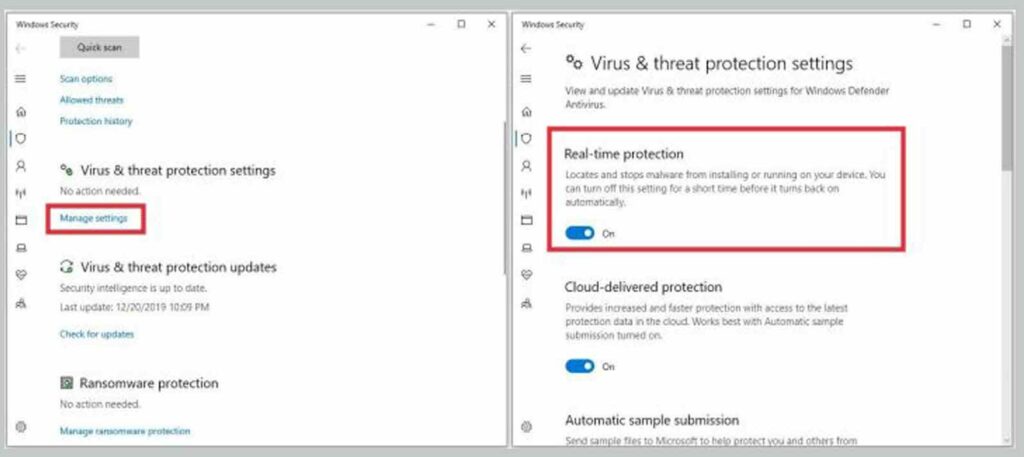
Windows Security based on my experience is good enough to prevent Windows 10 from catching viruses.
I have been using Windows 10 for 2 years on the PC used to make this post, and since it was first installed I have never used any antivirus, until now my computer is still safe, never got a virus.
The key is that we must be careful when installing applications from sources that are not reliable, especially those that offer the full version for free, aka pirated, usually, viruses and malware often enter from there.
10. Run Disk Cleanup
Storage space that is getting full, especially those used to store system files, can decrease the performance of Windows 10.
Therefore, we must ensure that the available storage space is not full. We can use the Disk Cleanup feature to solve this problem.
Disk cleanup is a utility in Windows that has been around for a long time, but most users rarely use it, even though this feature is good enough to clean junk files such as temporary files, cache, thumbnails, and files that we no longer need.
To speed up Windows 10 we have to clean up the garbage files that have accumulated.
How:
- Click the Windows button
- Type ” disk cleanup ” in the search bar
- Select the Disk Cleanup application that appears on the Start menu
- Select drive C
- Check the temporary files you want to clean
- Click Clean system files
- Click OK
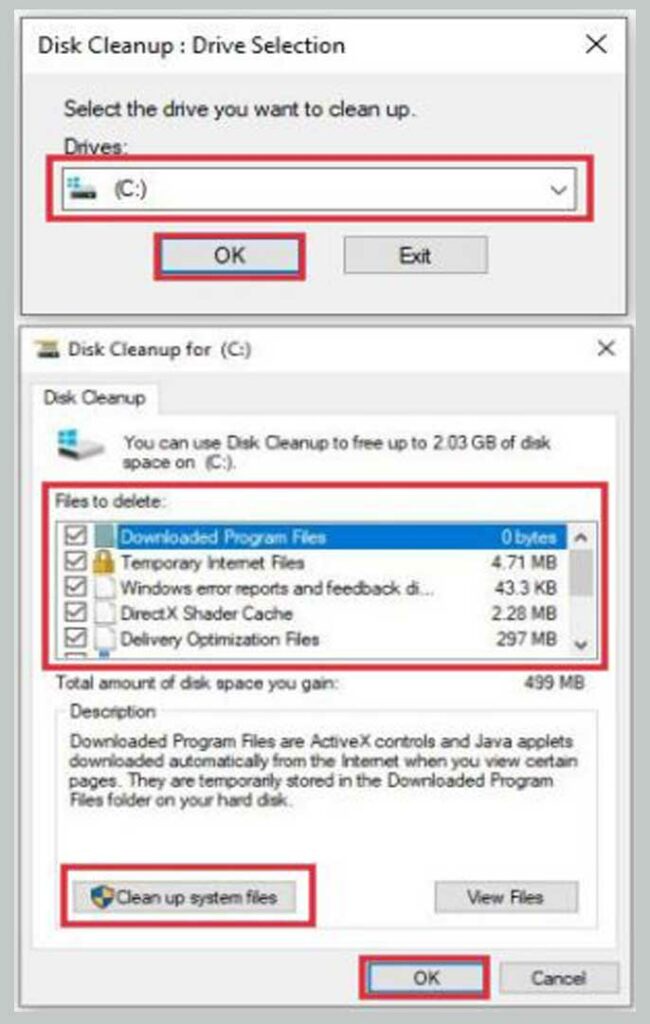
To clean the hard disk automatically from junk files that can burden the system, we can take advantage of a feature from Windows 10 called Storage sense.
This feature is quite useful to keep the C drive from filling up quickly, especially after a major update, because usually old Windows files remain on the hard disk unless we clean them.
How:
- Enter Settings
- Select System
- Select Storage
- Click on the Storage sense option until it becomes On
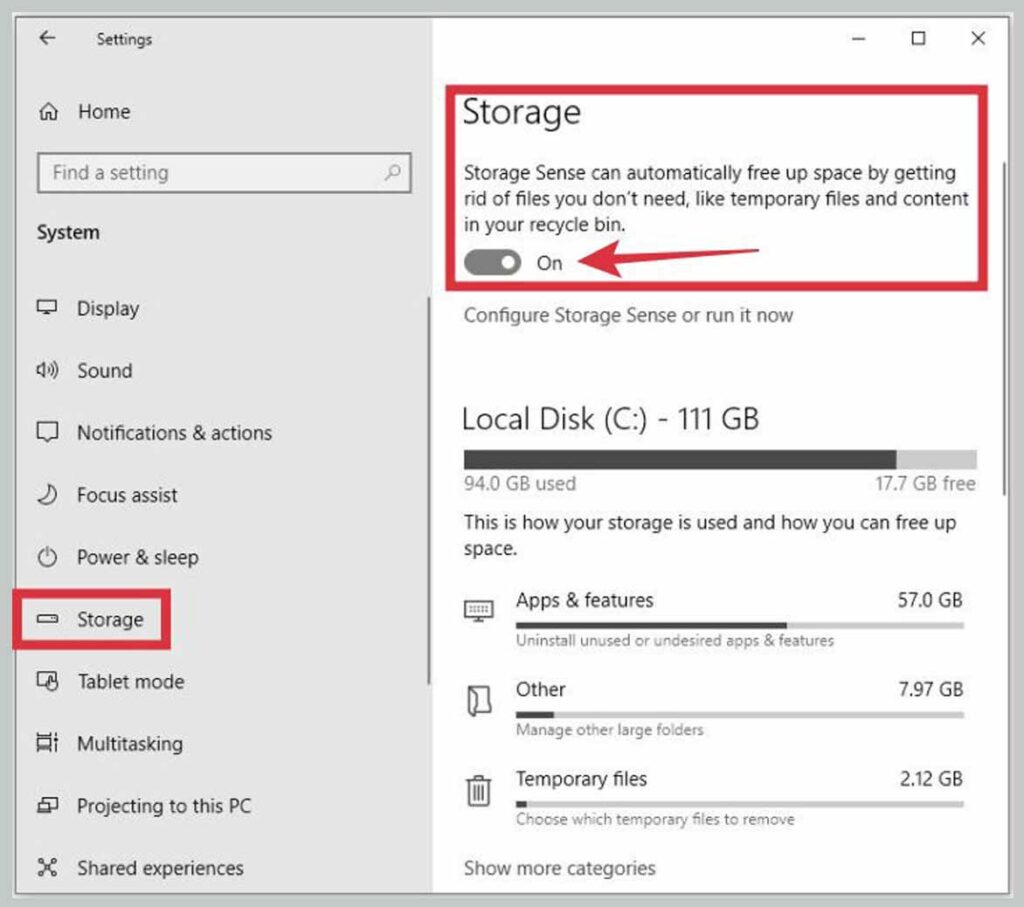
To clean junk files in Windows 10 automatically you can click on the Configure Storage menu sense or run it now under the on/off button.
After that, select the desired automatic cleaning schedule, whether every day, every two weeks, per month or every two months.
11. Upgrade RAM
RAM is a component that really determines the performance of a computer, the greater the RAM capacity, the better its performance in running heavy programs.
Working with multi-tasking without being supported by qualified RAM will make computer performance slow, for example, video editing while opening several browser tabs, or playing games while recording, and other memory-consuming activities.
The only most effective solution to solve this problem is to upgrade RAM. Try to check if there are still RAM slots left on the laptop or PC that you are using, if there are still there you can start setting aside money to buy a new RAM.
The easiest way to upgrade RAM is to double the current RAM capacity, for example, when the laptop you are using has 4 GB of RAM, then you can buy a new RAM of 4 GB, so the RAM on the laptop becomes 8 GB.
Having 8GB of RAM is sufficient to run various applications smoothly on Windows 10.
12. Increase Virtual Memory Capacity
Efforts to speed up the performance of Windows 10, what we can do next is add Virtual Memory or what is often referred to as the Paging file.
On the Windows operating system, virtual memory acts as an extension of RAM, similar to SWAP on Linux, its function is to accommodate files that are idle from running programs.
Virtual memory is taken from hard disk space, and by default, Windows has allocated hard disk capacity for virtual memory but its size is very small, we can add it ourselves to improve the performance of our Windows 10.
How:
- Open the Control Panel
- Select System
- Select Advanced system settings
- Click the Advanced tab
- In the Performance option-click the Settings button
- Click the Advanced tab
- In the Virtual Memory option, click the Change button
- Click drive C
- In the Custom, size section enter a value that is half or equal to RAM
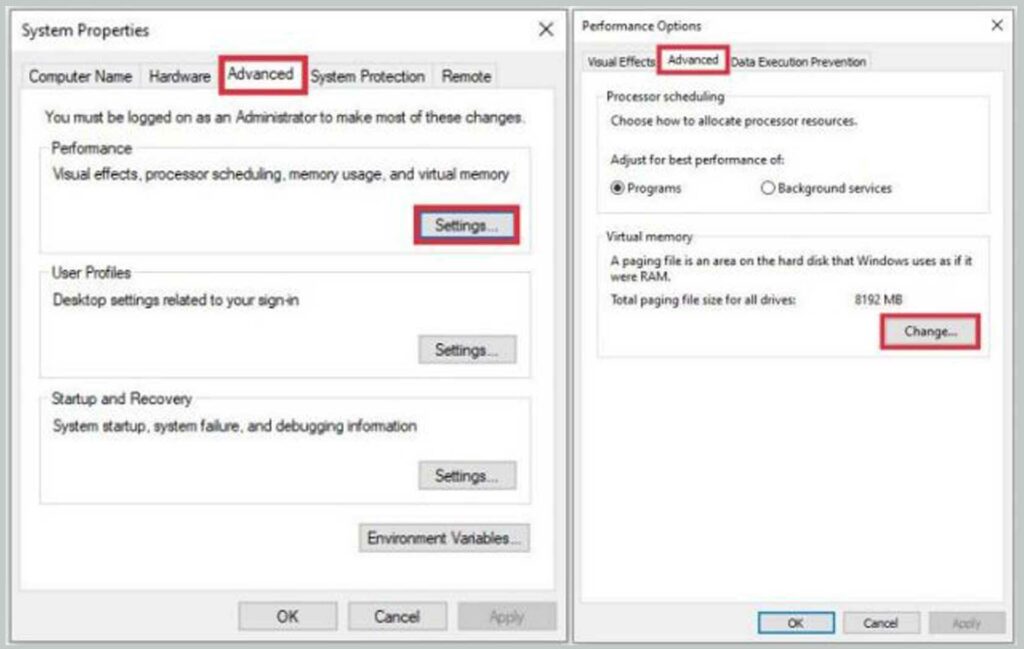
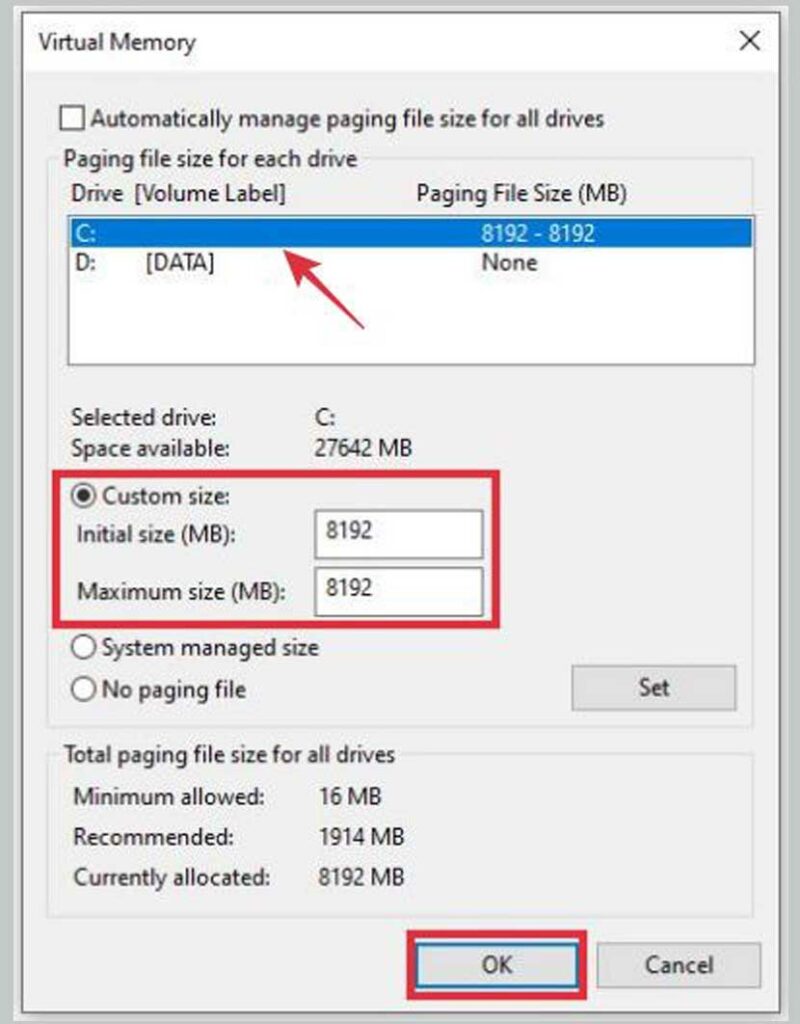
There is no set standard for the amount of virtual memory in Windows 10, but usually, the value that is commonly used is half or the same as RAM.
In the example above I used 8 GB of virtual memory, which is the same as the RAM capacity I use.
For example, your laptop has 4 GB of RAM, it can use virtual memory of 2 GB or 4 GB.
Especially for those who like to play games, it is advisable to use a VM that is the same size as RAM because it can help computer performance when playing games.
13. Update Windows
The next tip that is no less important for improving the performance of Windows 10 to keep it light and fast is to be diligent in updating it.
Microsoft will continue to release updates to fix bugs that often cause Windows 10 to be slow.
By updating we will also get the latest features, as well as improvements to system security. Therefore, updating regularly is highly recommended for Windows 10 users.
How:
- Make sure the computer is connected to the internet
- Open Settings
- Select Update & Security
- Select Windows Update
- Click the Check for updates button
- Wait for the update process to complete
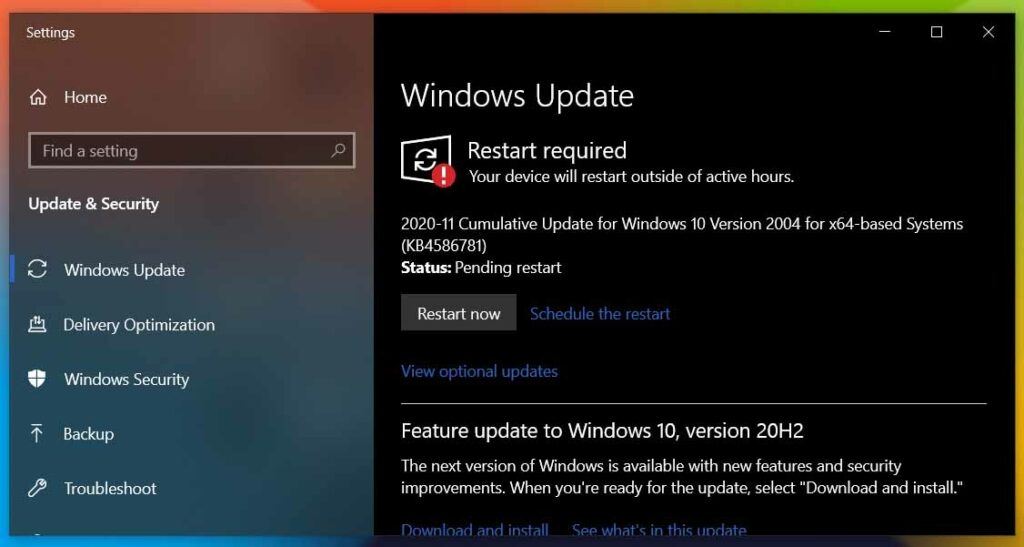
During the update process, especially major updates, our computer will restart several times, just follow the process to completion.
After that, click the Check for updates button again to make sure we have downloaded all existing updates.
14. Upgrade Hard Disk to SSD
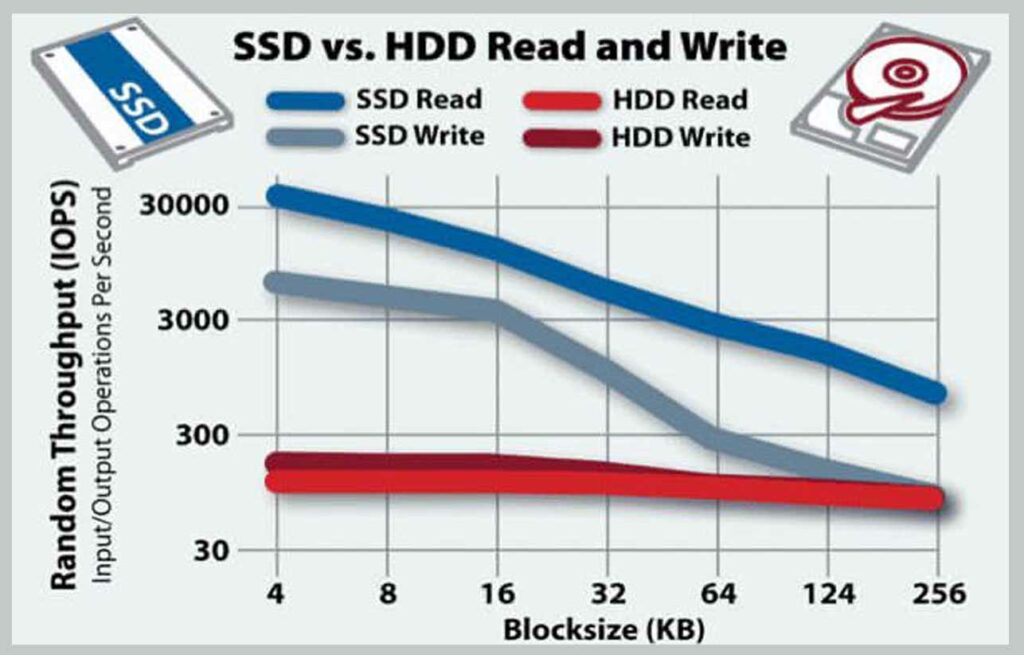
There is no doubt that upgrading the Hard Disk to an SSD will make computer performance faster. This does require additional costs, but the results will be very satisfying.
SSD has a data read and write speed 4-5 times faster than a hard disk so that it will make all processes on the computer faster.
The process of booting and opening the program will be faster. After you use an SSD, opening any program, whether heavy, no longer takes a long time.
Changing HDD to SSD can speed uploading files in Windows. When loading a large number of files, the time required will be very short so that in an instant all files appear as if without the loading process. The difference in speed with ordinary HDD is very pronounced.
Using an SSD will also speed up the copy-paste process of files, making it easier for us to move large files.
In essence, if you want to make your computer lighter, try replacing your hard disk with an SSD and feel the changes yourself.
15. Monitoring Laptop Temperature
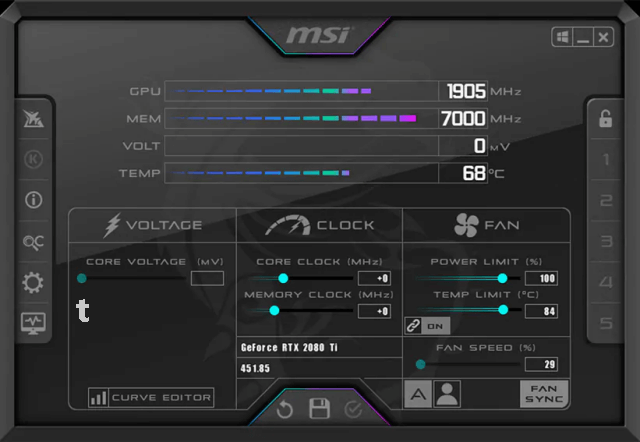
Overheating of laptop hardware components can also be the cause of Windows 10 being very slow.
When the CPU temperature exceeds the tolerance limit, the CPU will automatically perform a mechanism known as “throttling”, which is the process of decreasing the processor speed due to overheating.
When the laptop is overheated, you will immediately feel the effect, such as laptop performance that feels heavy and slow, freezing, even if the overheating is too extreme it can cause a blue screen (BSOD).
To find out whether the laptop is overheating or not, you can monitor the temperature when signs such as a fan that is spinning fast, is noisy, and feels that the heat has started to be abnormal.
Things you can do to deal with overheating is to check whether the cooling mechanism on the laptop is working properly.
Like checking the fan function and replacing the processor thermal paste when it starts to feel an abnormal temperature increase.
Conclusion
Those are some tips for improving the performance of Windows 10 so that it is light and fast, please try it on your laptop or PC which is starting to feel sluggish, how are the results? Tell me in the comments below!
from TechMaina
SOURCE TGG
Comments
Post a Comment